Parametric Furniture Model: Concept Phase


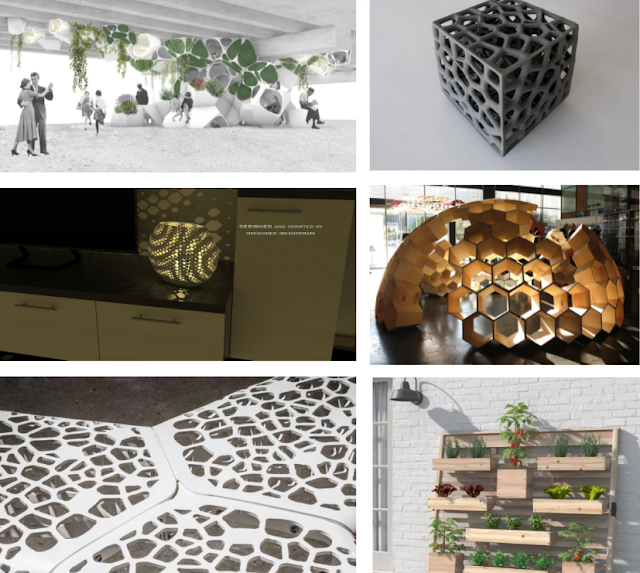
This week I came up with some ideas for a piece of parametric furniture. I started by researching other examples of furniture and other objects that are defined as parametric. I noticed additive designs looked really interesting, I also liked how the objects made out of additive patterns tended to look lighter and required less material. Common patterns of meshes I tried to use were hexagons, neuron-like shapes, or shapes that mimicked plant cell clusters. Next, I looked into materials, I found a variety of materials that could work but based on the texture I want to create, I think plastic is the most likely material I would go with. Here are some visual examples of the surface I want to create:


Here is a link to the document with all the Parametric Object Research and where the images are sourced.

After I finished my research I began to sketch some ideas. I was really interested in the idea of incorporating plants into furniture.


I chose the concept of a coffee table that has dents in the top of the table that fit plant pots. I am imagining that the coffee table would come with pots, and they would only fit into one of the dents. When not in use the dents could be covered by a plate to make a flat surface. I want to incorporate the surface texture of plant cells and create a very organic shape. Once I picked a concept I made it with play-doh to get a better idea of what it would look like.


I created a start of a definition for the table (currently in one solid shape). I then baked the start of the table to create the holes for the table. I wasn't sure how to do that in Grasshopper, but I would like to eventually have one of the variables be the number of dents that can be added.


Next week I want to spend some time figuring out how to create the meshed surface I want for the table. I have started looking at some tutorials, but I need to spend some more time on them before I attempt to do it myself. An alternate plan to the plant cell texture is to use the technique of having lots of thin shapes stacked together for the layered effect. That is how the taper in the above image was made.

I'm excited to see what I can do in Grasshopper with this concept.


Comments

Popular posts from this blog

Parametric Furniture: Renders

This week I finished creating my table. I switched from a coffee table to an end table, because I wanted the stem of the table to be longer, to better represent the shape of a plant. This table is a Voronoi patterned end table that is meant for a house plant to be a part of the furniture. The concept came from the question: how can plants become more integrated into our indoor environments? Plants, at least in my house, just sit on top of shelves and tables, this way the plant is fully a part of the furniture, and the growth of the plant determines the final design of the table. The name of this table is Nature Integrated Table.  The Voronoi pattern is inspired by the shapes of plant cells, and the overall shape of the table is inspired by a blooming plant. If this table was full size my hope is that the plant would be put in the dirt directly in the centre of the table, without a pot. This way the roots and the plant would start to grow through the Voronoi. The pattern also has na...

My First Definition in Grasshopper

 This week I did a series of tutorials about Grasshopper. Overall it was a smooth process. I learned a lot about curves, specifically Biarcs. The process of lofting curves in Grasshopper is really fun and led to a lot of interesting results. The first part of the tutorials didn't use Biarcs to create curves, instead, it used Arc, divide, and pull.  Once I got to the point in the tutorial where it said to pull up the centre of the curve I found it was much easier to control the shape of the curve. Changing the shape was quite a fluid process, but it was much easier once I began the Biarc section of the tutorial. Using the Biarc tool I started the process of connecting two curved lines over again. The results were a lofted shape that was easy to manipulate. Using the Brep Join tool was a great way to create one surface that was still a changeable shape.  The only issue I couldn't resolve in the tutorial was I couldn't get the gradient tool to work the way I wanted it to. I ...

Full-Scale Prototype Collab: Week 1

This week I began researching and sketching for my group (group 2)'s full-scale project.  Here is some of the work that inspired my thinking: I have my research document with all the sources of these images linked  here . Here are the 3 concepts I came up with: Idea 1: mix of the inspiration, taking a similar shape from the last table, and the idea of creating a barrier, or separator out of the pattern - looking through the design and whatever is on the other side Idea 2: Use a slightly spinning shape to create a spinning table base, glass on the top. When you look down through the centre of the base there is an optical illusion - idea 4 is another shape with the same concept - this one doesn’t spin, it just gets smaller. Idea 3: Small interlocking patterned pieces can be built into a bench or wall divider. Team two met on Wednesday and we decided to focus on creating a piece of furniture for the school, either for studying or relaxing. My revised concept sketch is below. W...