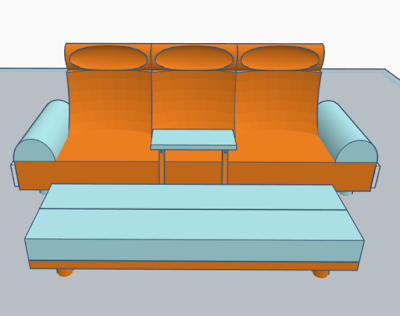
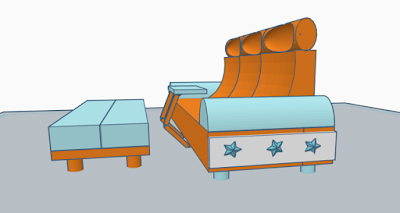
After watching the documentary Objectified by Gary Hustwit, I was left thinking about why some objects become important to us, and how industrial products can still have that effect even when they are made for millions of other people to enjoy as well. The designer Hella Jongerius spoke about some of her goals as a designer. A goal that stood out to me was that she wanted "to give individual character to something produced industrially." Then she showed a couch she and her studio were working on. It was orange with buttons placed all over it. I liked how this couch was so unique and as an object, it seemed to be able to tell its own story. This got me thinking about how I could do a take on this idea of a couch with individual elements, while also making it modern and functional. I thought about what makes a couch functional, and comfortable. I decided to add rounded armrests, which are always better when laying lengthwise, and I made each seat concave with a separate concave piece for the head. I also added a TV table that folds out from under each seat because I always want to sit on the couch with my laptop, without it actually on my lap. I also added a coffee table that has a fold-out cushion under each half to extend the couch into a bed. For the individualism element, I wanted something that would match with the modern look I wanted to achieve. I decided to add magnetic whiteboards on each side of the couch. (The stars are examples of magnets that could be used). These whiteboards could be used practically or to add a personal element to a couch, which tends to be a focal piece of furniture in whatever room it resides.
This week I finished creating my table. I switched from a coffee table to an end table, because I wanted the stem of the table to be longer, to better represent the shape of a plant. This table is a Voronoi patterned end table that is meant for a house plant to be a part of the furniture. The concept came from the question: how can plants become more integrated into our indoor environments? Plants, at least in my house, just sit on top of shelves and tables, this way the plant is fully a part of the furniture, and the growth of the plant determines the final design of the table. The name of this table is Nature Integrated Table. The Voronoi pattern is inspired by the shapes of plant cells, and the overall shape of the table is inspired by a blooming plant. If this table was full size my hope is that the plant would be put in the dirt directly in the centre of the table, without a pot. This way the roots and the plant would start to grow through the Voronoi. The pattern also has na...


Comments
Post a Comment